Im Folgenden die Anleitung, um die Firmware eines Panasonic UHD-Player (UB420, UB424, UB820, UB824, UB9000, UB9004) zu patchen, um die http-Schnittstelle ohne Authentifizierung nutzen zu können.
Aktuell unterstütze Firmware Versionen: 1.69, 1.70, 1.76
Alle relevanten Quellen sind am Ende dieses Posts gelistet. Bitte Problemen bitte dort weiter nachlesen.
Bei mir hat das Patchen laut dieser Anleitung beim dritten Versuch geklappt. Zunächst musste ich den PC wechseln und dann noch einen anderen USB-Stick nehmen.
Diese Anleitung hier basiert Großteils auf den „Short instructions by prodarek”
https://www.avforums.com/threa…dom.2441584/post-31906429
Ich habe diese aktualisiert und um ein paar Screenshots zur Veranschaulichung erweitert.
Follow this guide to patch your Panasonic Blu Ray / UHD player to make it region-free. This guide is for Windows users. Since the patch was made for Linux systems, will we use Virtualbox to run Lubuntu Linux inside Windows.
We have not tested this on Mac/OS using Virtualbox. It should (in theory) work on Macs with Intel's x86_64 architecture, made before late 2020. It absolutely WILL NOT work on Macs with Apple's ARM architecture, made in late 2020 and after.
This patch was created by JohnyL and DreckSoft, with assistance from AvForums users.
The Lubuntu virtual machine was prepared by prodarek. It contains all of the files you will need for patching.
DISCLAIMER: Patching the player is a dangerous and error-prone process. The authors will not take any responsibility for any damages. If you don't know what you're doing, don't do it.
You can learn more about the evolution of this effort at the following AvForums thread: "Let's Try to Put the Free in Region Freedom."
https://www.avforums.com/threa…in-regionfreedom.2441584/
Any patch updates will most likely be listed on that thread.
This patch will ONLY work if your Panasonic player firmware is 1.69. You can check by starting your player, then navigating to "Setup / Player Settings / System / System Information / Firmware Version Information." After you complete the patching process, your player might occassionally prompt you to upgrade your firmware, even years from now. DO NOT upgrade or you will lose the benefits of this patch and possibly worse. There may be a future patch for a future firmware version, but for now, stick with 1.69.
Supportet Versions: 1.69, 1.70, 1.76
This patch will ONLY work for the following Panasonic model numbers:
UB420, UB424, UB820, UB824, UB9000, UB9004
Instructions:
1. Download the following files and programs:
* VirtualBox via https://www.virtualbox.org/
Select your operating system, download, and install with the default options.
* prodarek's's prepared Lubuntu virtual machine via https://www.avforums.com/threa…dom.2441584/post-31906429
Unzip the folder to your Windows machine and take note of the directory. If this link stops working, check the AvForums thread to see if there is an updated version.
2. You will also need a USB drive. Make sure you don't need whatever is on it because we will be reformatting it.
3. On your Windows machine, open Virtualbox.
In the top middle of the Virtualbox window, click the icon named "Add." Navigate to the directory where you unzipped the Lubuntu virtual machine. Open "lubuntu.vbox".
Once added, click the "Start" icon to run the new virtual machine. If you get errors, you probably need to enable virtualization in your bios. To do so, restart your computer and click the key that opens your bios. This is different for every motherboard but will most likely be Del, F10, or F12. Somewhere in the bios settings, you will see an option to enable virtualization.
You may still get some errors, but as long as Lubuntu starts and you can see the Lubunto desktop, you are good to go.
4. Once the Lubuntu virtual machine is started, plug the USB drive into your computer. To mount the USB drive in Lubuntu, in the top menu of the Lubuntu window, click "Devices / USB" and then select the name of your USB drive.

Click "Open in File Manager." You can minimize this File Manager window for now.
5a. Download the Patcher (Patch-Program169-176_v2.7z) from
https://gofile.io/d/vxhB4f
with Firefox on the Lubuntu virtual machine.
Extract the file:

Set the „Trust this executabel“ fort the files
<Patcher>
<Dumper>
<tools/dburnner>

5. Still on the Lubuntu desktop, click the folder called "Panasonic Patcher." Double-click the program called Patcher and select "Execute."
Accept the software user agreement.
You are now inside the patching software. We will be returning to this software several times in this process.
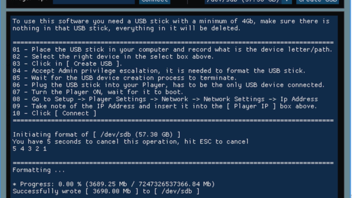
6. At the top right of the Patcher, click "Select USB Device." and then select your USB drive. Make sure you select the correct drive, or else you might accidentally erase something valuable.
Now click "Create USB." When prompted, enter the system password "lulu". The progress indicator is broken and will be stuck on 0 percent, but you can ignore it.
The patcher will begin formatting and writing to your USB drive. This will take several minutes. When finished, you will see a message that says something like "Successfully wrote [ 4096.00 Mb ] to [ /dev/sdb ]."
7. Navigate back to the File Manager window (still on your Lubuntu virtual machine.) Click the eject icon by the USB drive. This will unmount the drive so you can safely unplugged it
DO NOT skip this step.
Once unmounted, remove the USB drive from your computer.
8. Bring the USB drive to your Panasonic player, but don't stick it in yet. Power on your Panasonic player if it's not already on.
We need to make sure that a feature called "Quick Start" is turned off. This feature essentially leaves your player in a powered-on state even when turned off. In order for this patch to work, we'll need to completely turn off the player at several points in the process. To disable "Quick Start", navigate your player menu to "Setup / Player Settings / System / Quick Start". Make sure it is set to "Off".
9. Now power off your player. If you want to make sure it's completely powered-off, you can unplug/replug the power cable.
When the player is completely powered off, insert the drive. You can use the front or back port. Make sure no other USB device is plugged in.
Power your player back on.
Now we need to find your Panasonic player's IP address. Navigate your player menu to "Setup / Player Settings / Network / Network Settings / IP Address-DNS Settings". Take note of your IP address.
Escape back to the player's main menu. Leave it powered on, and leave the usb drive inserted.
10. Return to your computer and the Lubunto virtual machine. Bring up the Patcher window. If you closed it, that's ok. Just open it again.
11. In the Patcher, type your IP address in the top left corner where it says "Player Ip," then click "Connect."
12. Once connected, a new option will appear at the top of the Patcher called "Exec Script."
Click "Exec Script."
The dumping process should take from a few seconds to a few minutes. Make sure your Panasonic player stays on throughout the process. There are two files to dump: fma5 and fma7. It will say "### DONE ###" after dumping fma5 and then "### DONE ###" again after dumping fma7. Make sure you don't proceed to the next step until it says "### DONE ###" twice.

13. When the dumping is finished, return to your Panasonic Player. Power down the player. Make absolutely sure it is completely powered-down. You can unplug the power cord if you are not sure.
After your player is powered-down, remove the USB drive and bring it back to your computer.
14. Plug the USB drive into your computer. Your Windows machine (not Lubuntu), may tell you that the drive is unrecognizable and needs to be formatted. Just click cancel on those popups.
Bring up the Ubuntu virtual machine and mount the drive (Lubuntu top file menu / Devices / USB and then the name of your USB drive.) Click "Open in File Manager."
You may now see two partitions on the USB drive. The one we're using is 4096.00 Mb and contains the file "script.sh", among many others.
In a moment, we'll need to navigate to the USB drive directory inside a terminal window. While we're still in Lubuntu's File Manager, you can take note of the USB drive directory location by clicking one of the files inside the drive, then selecting "Properties." You'll see the location near the top. You can select it and copy it if you like, to paste later.

15. Now navigate to the Lubuntu start menu at the bottom left corner of the Lubuntu virtual machine. Select "System Tools / QTerminal".
16. In Qterminal, type "cd" followed by the directory of the USB drive, then hit enter. It will be something like, "cd /media/lu/XXXX-XXXX". If you copied it before, you can just paste it here. Hit enter.
17. Now type "dir" and hit enter to see the files in the directory. You should see a number of files, including "script.sh". If you don't see that file, you're not in the right directory.
18. Here is where you need to decide if you want two optional features: improved SRT external subtitles and http control of the player.
This will improve the look of SRT external subtitles, getting rid of that annoying blue background. You can see an example here: https://www.avforums.com/threa…584/page-29#post-31654115
It will also enable http control of the player without command authentication. You can learn more about this here: https://www.avforums.com/threa…584/page-31#post-31685167
If you WANT those features type "sudo sh 2_patch_srt_thttp.sh", then enter.
If you DON'T want those features type "sudo sh 2_patch.sh", then enter.
18. type „sudo bash 2_patch.sh“
You will be prompted for the system password, which again is "lulu". Qterminal will not show the password as you type, so it will look like it's not accepting your input. Just hit enter after typing it.
This command will take a few minutes to complete.
19. Type "mv -f 3_write.sh script.sh", then enter. Basically, we just replaced the old script.sh with our new version. If you want to check to make sure it worked, just type "dir" and enter. If you no longer see the file named "3_write.sh", you know it worked.

20. Go back to the File manager window in your Lubuntu virtual machine and unmount the USB drive by clicking the eject icon. Remove the drive from your computer and take it to the Panasonic player.
21. At your Panasonic player, power off your player (again, make sure it's completely powered off) and insert the drive.
Now power up your Panasonic player, leaving the usb drive in the player.
22. Return to your computer and the Lubunto virtual machine.
23. Bring up the Patcher window or reopen Patcher if closed.
In the Patcher, type your IP address in the top left corner and click "Connect."
24. Once connected, click "Exec Script."
IMPORTANT: You are now writing to the Panasonic player, which will take anywhere from 15 to 25 minutes. If the player turns off during that process, it could brick it (i.e. render it permanently inoperable). Your Panasonic player will turn off automatically if no button on the remote is pressed after 20 minutes. To prevent auto-shutdown, you should press the navigation arrows on the remote around the 15 minute mark. Do not open any of the menus, just use the navigation left/right arrows.
The patcher will write fma5 and then say "### DONE ### (this will happen within a few minutes), then it will write fma7 and say "### DONE ###" for a second time. (This will take 15 to 25 minutes so don’t panic and think it’s stuck!)
Make sure you don't stop it prematurely, otherwise you may brick your player.
Best not to use your computer for anything else while this process is happening, except for making sure it doesn't go into power-saving mode.

25. Once the patching is complete, return to your Panasonic Player. Turn it off and remove the USB drive.
25a. After the next Power On the Patches are applied and http-control works without authenitcation
26. You can now close all windows and shut down the Lubuntu virtual machine. Congratulations! You now have a region-free player!
If you encountered any errors in the process, please make sure you didn't skip any steps. You can refer to the following AvForums thread to see if there are solutions: https://www.avforums.com/threa…in-regionfreedom.2441584/
The most common mistakes seem to be 1. forgetting to completely power down your usb drive before removing it from the player and 2. forgeting to hit "Exex script" the two times you need to do it in the Patcher.
Infos for the Codefree Options
For a complete list of codes, refer to the file named PanasonicCodefree.pdf inside the Panasonic-Patcher directory on the Lubuntu desktop.
For initial testing purpose, here are the most useful codes:
Code to change disc region:
OPT OPT OPT DVDREGION BLUREGION
OPT = The Option button on your Panasonic Remote
DVDREGION = DVD Region (1=Region 1, 2=Region 2, 3=Region 3, etc.)
BLUREGION = Blu-ray Region (1=Region A, 2=Region B, 3=Region C.)
When your player is turned on and at the main menu, enter the code. Once entered, the unit will restart, then you can check to see if the code worked with an appropriate disc.
So for DVD Region 2 and Blu-Ray Region B, the code would be:
OPT OPT OPT 2 2
We also recommend that you turn on Advanced Features with the following code:
OPT OPT OPT 9 1
Advanced Features
Advanced Features will override the default mechanism for determining the country code setting of your player. (Please note: Country code is NOT the same thing as Region Code.) TLDR, this will play some discs that otherwise wouldn't work. You can also manually set a specific country code. Refer to PanasonicCodefree.pdf for more info.
Advanced Features also gives you more playback control (being able to turn off subtitles, pause the video, or return to the main menu at times when the disc manufacturer prhibits you from doing so.)
Advanced Features also deactivates off Automatic Power-Off, which would otherwise turn off the player after a certain time of inactivity.
Credits for the program and a lot of information about the RF changes go to JohnyL from AVForums. This patch could not have been done without him.
Hopefully someone will help improve the firmware further like *real* PUO Off.
Quellen:
AV-Forum
https://www.avforums.com/threa…-in-regionfreedom.2441584
Short Patch instructions by prodarek
https://www.avforums.com/threa…dom.2441584/post-31906429
Detail Patch Instructions by thegreenry
https://www.avforums.com/threa…584/page-25#post-31644838
http command list by geekerth
https://www.avforums.com/threa…dom.2441584/post-31685167
Panasonic File Structure by tridentsx
https://www.avforums.com/threa…dom.2441584/post-31360689
Codefree Options by Drecksoft
https://www.avforums.com/threa…dom.2441584/post-31167167
Link to the actual Patcher
https://www.avforums.com/threa…584/page-50#post-32041951
https://gofile.io/d/vxhB4f